Saturday, July 31, 2010

Buttermilk Dill Salad Dressing

This salad has me sneaking into my kitchen at all hours to dunk veggies into it.  That involves me sneaking into the kitchen and forgoing banana bread, macaroons, 3 pounds of jelly beans, and my all time favorite S'mores Goldfish Crackers.  So I do give this dressing a good amount of credit.  It's cool and creamy (but low in fat!), and the dill and the garlic are a great combination.  This is great tossed over a simple iceberg lettuce salad, but I'm sure that fancier lettuces would not complain too much.  If you want to use this as a dip (and I suggest you try that too!), use 1/3 cup buttermilk instead of 1/2 cup.  Also, this is good and garlicky, which is fabulous for me.  If you want to be a little more polite around company, than just use 1 clove, not the two!

Buttermilk Dill Salad Dressing
serves 4-6

Ingredients:
1/3 cup light mayonnaise
1/2 cup low-fat (or non-fat) buttermilk
2 garlic cloves, pushed through a garlic press
2-3 Tbsp finely chopped fresh dill
2 Tbsp lemon juice
1 Tbsp honey
1/4 tsp salt
1/8 fresh ground black pepper (or more to taste)

Direction:
Combine all ingredients in a small bowl, and whisk well. 

Friday, July 30, 2010

Cardamom Cinnamon Macaroons

This is another fabulous recipe from my much beloved Modern Spice by (Monica Bhide), and another fabulously delicious, easy, quick coconut recipe.  These cookies come together in just a few minutes, and they have a bright flavor from the cardamom with just a touch of warmth from the cinnamon.  They are nice and light, and perfect for nibbling on throughout the day (guilty as charged), but also a lovely dessert served with a little sorbet or coffee and tea.  Plus, they are gluten-free!

The original recipe in Modern Spice calls for saffron with the cardamom, which I dream of trying one day when I can afford saffron and not feel guilty about it!  But Bhide suggests a few other spices to try, including cinnamon (which I tried) and curry powder.  I can't wait to experiment a little with this recipe!  Can I tell you how much I love it when cookbook authors give you permission and even make suggestions about ways to experiment?  You see, I am a rule follower, through and through.  With the exception of my refusal to wear a winter hat in the 8th grade (sorry Mom!), I have been as conscientious as they come.  I do not wear black and brown at the same time.  I use my turn signal even when turning within otherwise abandoned parking lots.  And so, I sometimes feel kind of guilty when I do not follow a recipe to the letter.  I just have this horrible feeling that if, for example, Ina Garten knew that I sometimes do not use the full stick of butter she told me to use, that, well, she might not approve.  So please don't tell Ina!  But do check out Modern Spice, and do try this recipe.

Cinnamon-Cardamom Macaroons
yields 30-35 small macaroons
from Modern Spice, by Monica Bhide

Ingredients:
Nonstick cooking spray
1 14oz package shredded sweetened coconut flakes
10 oz sweetened condensed milk, from a 14 oz can (I used nonfat with great results.)  (Also, um, I didn't measure, and things went great.  I am really breaking the rules here!)
1/2 Tbsp ground cardamom
1/2 tsp ground cinnamon
1/4 tsp salt
2 large egg whites, at room temperature
1 pinch cream of tartar

Directions:
1. Preheat the oven to 350 degrees.  Cover a baking sheet with parchment paper, and then spray it lightly with non-stick spray.  (I would not skip this step!  The parchment paper was crucial.)
2. Whip the room temperature egg whites to soft peaks.  Add a little cream of tartar to stabilize the  egg whites.
3. Combine the coconut, the sweetened condensed milk, the cardamom, the cinnamon, and the salt in a large bowl.  Stir thoroughly.
4. Gently fold in the egg whites.
5. Using a spoon or a small cookie scoop, shape the mixture into tablespoon-sized balls.  Place each one 1 inch apart on the baking sheet.
6. Bake for 14-16 minutes, until the outside is slightly brown, the middle is soft, and the bottom is starting to brown a little. 
7. Remove from the oven.  Allow to cool at least 20 minutes.
8. Serve at room temperature.  Bhide says that these store well in an airtight container for up to a week, but good luck keeping them around that long!

Thursday, July 29, 2010

Hot and Smokey Franks and Beans

This recipe really started with my pure hatred of exercise.  I know, I know, it's not that cool to say that out loud, but here it is: I really hate working out.  I'm sure there are all kinds of exercise I could try and maybe like better.  I will even confess that yoga is not that bad, but it never happens when I want it to happen.  Basically, this is how I get myself to work out: I bribe myself.  It works great!  Basically, what you do is you whine and procrastinate and drag yourself to the gym five days a week, complain half the time you are there, and once you get through the fifth ordeal of this, you buy yourself a little present.

So a couple of weeks ago, I bought myself a bag of Rancho Gordo Yellow Indian Woman Beans.  I found a whole bunch of Rancho Gordo beans at Wasik's, in Wellesley, and immediately remembered having read about these spectacular heirloom beans in my Eating Well magazine a year or so ago.  So, after much serious bean deliberation, I finally chose the Yellow Indian Woman beans, and commenced my bean recipe research!  There are a lot of bean recipes that I want to try, which is probably not a crisis since I now own a lot of beans.  I am still looking forward to trying Biz's recipe in my new slow cooker!

I went with this recipe because the beans aren't baked, and in the research I did online, people recommended that you could taste the Rancho Gordo beans better if you don't bake them.  So I cooked up the whole pound, tossed half of it in this recipe, and left the other half plain.  I have big ideas for the rest of those beans!

This recipe is definitely worth a try.  It is spicy and smokey, with a nice depth of flavor.  There is much less sugar and tang in here than your avergage franks and beans recipe.  You can shorten the cooking time by a lot by using canned beans -- I would use 2 cans of drained, rinsed pinto beans.  This is a great way to pack in a lot of protein and fiber. You might even try adding some chopped onion or some peppers to the pan when you add the hot dogs.

Hot and Smokey Franks and Beans
serves 3-4
adapted from EveryDay with Rachael Ray, August 2010

Ingredients:
1/2 pound Rancho Gordo Yellow Indian Woman Beans (or 1/2 pound pinto beans)
3-4 large cloves garlic
Salt
1 Tbsp extra-virgin olive oil
6 turkey hot dogs (such as Jennie-O)
1/2 Tbsp chile powder
1 Tbsp smoked paprika
1 tsp cumin
1/4 tsp cayenne pepper
1 cup tomato sauce
1 Tbsp brown sugar, packed
1 Tbsp red wine vinegar

Directions:
1. Soak the beans overnight, and drain.
2. Smash and peel the garlic gloves.  In a large saucepan, bring the beans, garlic, and 3-4 cups of water to a boil.  Once the pot comes to a boil, lower the heat and simmer for 1 hour and 15 minutes, partially covered.  Stir occaisonally.  Cook until the beans are quite tender.  Add salt to taste (I used 1 tsp).
3. Once the beans are close to being quite tender, begin slicing the hot dogs.  Meanwhile, heat the olive oil in a large skillet over medium-high heat.  Add the slices of hot dog, and saute until they begin to brown.  Add the smoked paprika, chile powder, cumin, and cayenne, and stir through.  Cook for an additional minute to toast the spices.
4. Add the tomato sauce, and stir to combine.  Add the brown sugar and raspberry vinegar.
5. Add the beans to the skillet, stir to combine.  Cook for an additional 5-10 minutes to thicken the sauce, and then serve. 

Wednesday, July 28, 2010

Coconut Sorbet

This could not be easier -- the hardest part of making it is just waiting for it to be done!  It has a rich, creamy consistency, but no dairy.  I made this for my husband to celebrate our big 1-month wedding anniversary, and he was quite content.  He has been hinting (subtly and not so subtly) that he would like me to make coconut sorbet for a year or two now, so it was about time that he got his wish!  I dare say, he looked quite content with the result. 

This recipe contains (well, more like consists of) an ingredient that was new to me, cream of coconut.  This is different than coconut milk, and it is found near the cocktail ingredients (like the margarita mix) in your supermarket.  It is also, by the way, looks completely disgusting when you pour it out of the can.  Close your eyes and have faith!  I added very small amounts of cardamom and lemon juice to mine -- next time I'd like to try doubling the amounts, or perhaps using lime juice instead of lemon.

Coconut Sorbet
serves 4-6

Ingredients:
1 can Cream of Coconut (such as Coco Lopez)
1 can water
1/2 tsp vanilla
1/2 tsp lemon juice
1/2 tsp cardamom

Directions:
1. Shake the cream of coconut vigorously.
2. Open the can and pour it into a mixing bowl.  Try to ignore and forgive its appearance.
3. Add the can of water, the vanilla, the lemon juice, and the cardamom.
4. Whisk the mixture vigorously.  Your ice cream maker won't mix this for you!
5. Pour into your ice cream maker and follow the manufacturer's directions.


Tuesday, July 27, 2010

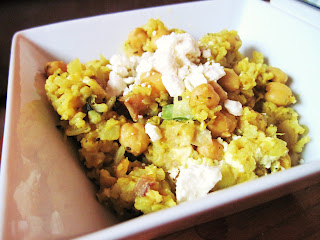
Chickpeas and Rice with Zucchini, Dates, and Feta

Chickpeas and Rice is one of those recipes that I am always making around here, and always tweaking.  Last night, however, I think I hit on just the right notes -- it's a great blend of Middle Eastern flavors: cumin, turmeric, marjoram, sweet onions, a hint of heat from crushed red pepper, plus a nice balance from the sweet dates and salty feta.  The reason why I'm always making this dish (and always tinkering with it!) is that it represents for me the perfect trifecta: pretty quick, pretty healthy, and pretty cheap.

I have to tell you though, last night's dinner started with a great tragedy.  It was devastating.  You see, I had bought these really cute globe zucchini at the farmer's market last week.  And I came up with this idea to stuff them with chickpeas and rice.  I was really excited about this.  And I mean, really excited.  But then, as I spooned into the first zucchini to hollow it out, my spoon came out brown.  Not good.  Not good at all.  What is good though is that I managed not to cry, which is more than I can say about a certain incident I  had with pizza dough a couple of months ago!  So I tossed the icky zucchini, cussed out the farmer's market (totally all their fault), and chopped up the other zucchini and just added to my Chickpeas and Rice.  The dinner was delicious anyway, so there you icky zucchini!

Chickpeas and Rice with Zucchini, Dates, and Feta
serves 4-6
adapted from The New Jewish Holiday Cookbook by Gloria Kaufer Greene

Ingredients:
Quick-cooking brown rice to yield 2 cups (I used 2 bags of brown rice in a bag!)
1 Tbsp extra-virgin olive oil
2 small (or 1 large) onions, diced
1 cup diced zucchini (about 1 medium zucchini)
2-3 garlic cloves, pushed through a garlic press
1/2 cup warm water
1 19oz can chickpeas, drained and rinsed
3/4 tsp dried marjoram leaves
3/4 tsp dried basil leaves
3/4 tsp ground cumin
1/2 tsp turmeric
1/4 tsp red chile pepper flakes
1/4 tsp ground black pepper
about 1/3 cup chopped dates
1/4 cup crumbled feta cheese, plus extra for serving

Directions:
1. Prepare the rice according to the package directions.  Meanwhile, chop the onion and zucchini.
2. Heat the oil over medium-high heat in a large skillet or sauce-pan with a lid.  Add the onion and zucchini once the oil becomes fragrant.  Cook for 5-7 minutes, until the vegetables begin to soften.  Then add the pressed garlic and cook for an additional minute, until you can smell the garlic cooking.
3. Add the chickpeas and the basil, marjoram, cumin, turmeric, salt, red chile pepper, and ground black pepper.  Stir through and cook for a minute.
4. Lower the heat to medium-low, and add the rice and the warm water.  Stir through. 
5. Cover the pot and cook for 10-15 minutes, checking on it now and then.  If the rice begins to stick to the pot, add a little more warm water.
6. Add the chopped dates and 1/4 cup feta cheese, and stir through.  Replace the lid and cook for an addition 3-5 minutes.
7. Serve each portion with 1 Tbsp of feta cheese on top.

Other ways to serve include:
-- in a pita pocket
-- with a little plain yogurt on top
-- with toasted chopped walnuts on top
Also, try replacing the zucchini with peas and carrots, or broccoli

Monday, July 26, 2010

Monica Bhide's Sunday Night Skillet Chicken and Rice

My mom had a great tradition for our birthdays when we were growing up, in that on your birthday, you got to pick out what she made for dinner.  I always used to look forward to this and spend basically a year thinking about what I wanted!  My mom is a GREAT cook, and so it was hard to go wrong.  I think that one of my stand-bys was her pasta primavera, though you could never go wrong with her mac and cheese either!

I have enjoyed sharing this tradition with my husband and his family.  Last night we had my in-laws over for a very, very belated birthday dinner for my father-in-law.  My father-in-law's birthday is in early June, and I was running around like a crazy bride then, in no shape to making birthday dinners.  But I didn't forget!  My in-laws have done some traveling in India the past couple of years, and so my father-in-law, upon hearing that I had a new Indian cookbook, requested Indian food.  I was only too happy to oblige!

Here is my adaptation of Monica Bhide's Sunday Night Skillet Chicken and Rice.  I changed it a little to make it a little less spicy for my mother-in-law, and also to fit it into our budget.  The recipe calls for basmati rice, which I did not have around, so I just used plain old white rice.  Also, Bhide calls for skinless, boneless chicken breasts or thighs.  If you are using these, you can just brown them after the turmeric and chile pepper is added, brown them for 10 minutes, and then add the rice.  I used skin-on, bone-in chicken breasts because they were cheaper at the store this weekend.  (And talk about frugal...I now have the chicken bones in my freezer to make stock!)  I also substituted cumin for coriander because I ran out of coriander! 

That said...this dish was delicious!  Everyone loved it.  The combination of spices is incredible.  I think the cinnamon is really what rounds it out...I love the sweet and spicy combination of flavors.

Monica Bhide's Sunday Night Skillet Chicken and Rice
serves 4+
adapted from Modern Spice by Monica Bhide

Ingredients:
2 Tbsp canola oil
1 1-inch cinnamon stick
2 bay leaves
1/2 large red onion, minced
2 garlic cloves, pressed through a garlic press
1 Tbsp grated ginger
2 medium to large tomatoes, diced (you can also use a 28 ounce can of crushed tomatoes if you make this    off season)
1/2 tsp red chile pepper flakes
1 tsp ground turmeric
1 pinch coriander (that was what I had left!)
1 Tbsp cumin
sea salt
2 medium to large bone-in, skin-on chicken breasts.
1 Tbsp olive oil
black pepper
1 cup white rice
2 cups water

Directions
1. Preheat the oven to 350 degrees.  Prepare a baking pan with aluminum foil.
2. Place the chicken breasts on the baking pan, skin side up.  Rub the chicken breasts with 1 Tbsp olive oil.  Salt and pepper them generously.
3. Roast the chicken breasts for 30-40 minutes, until cooked through.  Remove them from the oven and allow to cool.
4. In a large, deep lidded skillet, heat the vegetable oil over medium.  Add the cinnamon stick and the bay leaves.  Once the spices begin to sizzle, add the minced red onion, along with the garlic and ginger.  Cook for 5-7 minutes, stirring occasionally, until the onion softens and gains some color.
5. Add the tomatoes, and cook for 10-12 minutes, until you can see the oil begin to separate from the mixture.  You can use a potato masher to crush the tomatoes as they cook.  If the mixture begins to stick, you can add up to 1/4 cup of water. 
6. Add the chile pepper flakes, turmeric, coriander, cumin, and salt to taste.  Cook for another minute or two to heat the spices, stirring continuously.
7. Add the rice and stir through.
8. Add the water and bring to a boil.  Then reduce the heat, cover the skillet, and cook for another 15 minutes. 
9. Meanwhile, you can remove the skin of the chicken and shred it off the bones.  Frankly, I find this works best with my hands!
10. Add the chicken to the rice mixture and stir it through.  Cover the pan and cook for an additional 5 minutes.
11. Remove the cinnamon stick and bay leaves.  Fluff the rice with a fork and serve. 

Sunday, July 25, 2010

Masala Omelet

Eggs for dinner again at our house!  And if I have not already convinced you to run out to the store and treat yourself to a copy of Modern Spice (by Monica Bhide), I hope that this will.  This dish was delicious -- well-balanced and full of flavor.  If you have never swirled a little turmeric into your eggs, you really have to try it.  This dish is actually listed as an appetizer, but I adapted it a little bit to serve it as dinner.  Basically, I combined it with a serving suggestion from an omelet in Nigella Bites, by Nigella Lawson, that is also seasoned with Indian spices, and tucked each omelet into a whole-wheat tortilla. (See?  We eat some variation of eggs on bread all the time!)  I served this with leftover homemade Green Chile Chutney, and a little storebought mango chutney.  You can buy Green Chile Chutney in the stores, as well...I saw it at my local Indian grocery store yesterday.

Here is my adaptation.  And...if you are interested in Modern Spice, I am making a whole menu from this cookbook for my in-laws tonight.  Some of the dishes that we are trying include: "Have a Date with a Fig," "Sunday Night Skillet Chicken and Rice," and "Cinnamon-Cardamom Macaroons."

Masala Omelet
serves 2
adapted from Modern Spice, by Monica Bhide, and Nigella Bites, by Nigella Lawson

Ingredients:
 4 large eggs
1 very small yellow onion, diced very finely
1/4 tsp ground turmeric
1 pinch ground cumin
1/4 tsp sea salt
1/4 - 1/2 tsp red chile flakes
1-2 Tbsp finely chopped cilantro
2 tsp canola oil
2 whole wheat tortillas (mine are 8 inches)
Green Chile Chutney
Mango Chutney

1. In a medium bowl, whisk together the eggs, onion, turmeric, ground cumin, salt, chile powder, and cilantro.
2. In a medium or large non-stick skillet, warm about 1 tsp of canola oil over medium heat.  Once the oil is hot and glimmering, pour in half of the egg mixture.  Swirl the pan to spread it out.  While the omelet is cooking, heat the tortilla in the microwave in between 2 damp paper towels for 15-20 seconds.
3. Once the omelet is well set and the underside is brown, flip it over.  And if your's fails to flip neatly, tell yourself not to worry, because you are tucking the whole thing into a tortilla anyway. 
4. Cook the underside of the omelet until it is firm.  Slide it out of the pan and onto one of the whole wheat tortillas.
5. Heat the second teaspoon of canola oil in the non-stick skillet.  Once it is hot, cook the second omelet using the same technique as above.
6. Top each omelet with a dollop of green chile chutney or mango chutney, according to taste.  A little chopped cilantro would be great tucked in here as well.

Saturday, July 24, 2010

Bangers with Caramelized Red Onions


Okay, first things first....we've had some very mature laughter over here about the name of this dish.  God Bless the British for bringing us many foods with delightful names (Toad in a Hole, anyone?). 
Second things second...I'm not sure if technically these count as "bangers" since I used sweet Italian turkey sausages.  So, if you are British, and you are reading this, please find it in your heart to forgive me.  And then correct me.  Gently, if you will.
This is another adaptation of a Delia Smith recipe from How to Cheat at Cooking, only I cheated at cheating and took things the long way around, which turned out to be perfectly delicious.  This cookbook, like some of my other British cookbooks (notably one or two of my Nigella Lawson cookbooks), calls for caramelized onions in a jar.  The British are clearly smarter than us, or at least smarter than me, because I cannot seem to find these in your average supermarket.  I vaguely recall once seeing them in a specialty shop and then leaving them there, so now I am kicking myself.  If you know where to find caramelized onions in a jar, I am clearly not the sort of person who would be disdainful of such things, so tell me where to find them!

Bangers with Caramelized Red Onions
adapted from How to Cheat at Cooking, by Delia Smith
serves 3-4

Serve these with mashed potatoes for "bangers and mash!"

Ingredients:
1 pacakage  (about 20 oz) of sweet Italian turkey sausages
1 large red onion, sliced into thin half-moons
1 Tbsp butter
1 tsp canola oil
1 Tbsp red wine vinegar
1 cup red wine
1 tsp dried thyme

Directions:
1. Melt the butter in a large skillet on medium heat.
2. Add the onions.  Saute for about 20 minutes or so on medium to medium-high heat.  Stir about every 5 minutes or so...not too frequently! 
3. Once the onions start to gain a little color, lower the heat to medium-low.  Cook for another 30 minutes or so, stirring occaisonally so that they begin to caramelize.
4. Add the canola oil to the pan.  Let it heat through for a minute or so.
5. Move the onions to the edges of the skillet.  Add the turkey sausages.  Raise the heat back up to medium.  Cook the sausages for 15-20 minutes, turning them once or twice.
6. Turn the heat up to medium-high, and add the red wine, red wine vinegar, and thyme.  Let the sauces bubble and thicken for a couple of minutes, and then serve.

Thursday, July 22, 2010

Chile Eggs on Bread

Now this is the kind of thing we eat around here all the time...eggs on bread!  We eat a few variations of this, our most common being a simple recipe from Everyday Italian by Giada DeLaurentis that consists of marinara and a fried egg on toasted ciabatta.  We have eggs for dinner fairly often around here.  They are a great economical source of protein.  We try to keep our grocery budget around $50-$60 a week for the two of us, so I am very glad that we now know that eggs don't increase cholesterol. 

This recipe comes from a cookbooks that I bought in London, at Books for Cooks, the famous Notting Hill Shop devoted to cookbooks.  It was hard to pick just one cookbook to take home, but this Delia Smith cookbook really caught my attention.  How to Cheat at Cooking has a great assortment of tasty and quick recipes.   I love that it has some recipes that are quite British, such as bangers and mash, which we are having tonight.

And now I present Chile Eggs on Bread!  This is a great flavorful meal made mostly with things from your pantry.  It comes together very quickly, and there is something I just love about the combination of the heat from the peppers and the oozing yolk from the poached egg.

Chile Eggs on Bread
serves 2-3
Adapted from Delia Smith's How to Cheat At Cooking

Ingredients:
4 eggs
1 tsp canola oil
1 7oz jar roasted red peppers
1-3 Tbsp sliced jalapeno peppers (depending on how spicy you want it) (and mine came from a can)
1 medium onion, peeled and quartered
1 large clove of garlic, peeled
14.5 oz can diced tomatoes, drained
6-12 pitted Kalamata olives (optional)
whole wheat ciabatta.

Directions:
1. Pre-heat the broiler.
2. Use a mini-food processor to chop the onion, garlic, and jalapeno (or just do it by hand if you do not have a chopper).  Meanwhile, heat the oil in an oven-safe skillet.
3. Once the oil is hot, add the jalapeno, onion, and garlic.  Soften the vegetables for 5 minutes, until they begin to take on some color.  Meanwhile, slice the roasted red peppers into thin strips.
4. Pour the drained diced tomatoes and the roasted pepper strips into the skillet.  Cook an additional 5 minutes or so, stirring frequently.  Salt to taste.
5. Meanwhile, slice the ciabatta in half, and cut into chunks that are about 5 or 6 inches long.
5. Break the eggs into the pan, and cook over medium heat for 4 oven.  Place the skillet under the broiler for a minute or two, until the eggs are done to your liking.  Watch them closely! 

Wednesday, July 21, 2010

Too Spicy for a Man, but Just Right for a Woman!

Last night my mom and her beau came over for an impromptu dinner.  We served the Pan-Fried Zucchini and Yellow Squash with Cumin from my new cookbook, Modern Spice by Monica Bhide, which combined perfectly with my mom's Tandoori-Spiced Chicken Cutlets.  On the side, I served two chutneys: mango chutney from Trader Joe's, and a homemade Green Chile Chutney that I adapted from Modern Spice.  I rounded the meal out with a quick rice pilaf.  Now that Green Chile Chutney really did the guys in!  My husband loves spicy food, but I did see some leftover on his plate.  My mom and I polished ours off, however, though I will confess there were a few runny noses.  I actually really liked it, and am looking forward to using the rest with omelets later this week.  Though maybe I will invest in a little yogurt to serve with it to cool things off!

The main dish, the Pan-Fried Zucchini and Yellow Squash with Tandoori Chicken Cutlets was wonderful.  The two dishes combined easily, and were flavorful, fresh, and light.  That is what I've loved about this new cookbook so far -- the dishes are all light, healthy, but very flavorful. 

Pan-Fried Zucchini and Yellow Squash with Cumin
Serves 5

From Modern Spice, by Monica Bhide, with minor adaptations

Ingredients:
2 Tbsp canola oil
1 Tbsp cumin seeds
1 large zucchini, diced
2 large summer squash, diced
1/2 red bell pepper, seeded and diced
1 tsp ground turmeric
1/2 tsp red chile flakes
sea salt
1/2 Tbsp fresh lemon juice

Directions:
1. Heat the oil in a large skillet over medium heat.  Add the cumin seeds.  When the seeds begin to sizzle, add the diced zucchini, yellow squash, and red bell pepper.
2. Fry the vegetables over high heat until they are crisp tender, about 8 minutes or so.
3. Add the turmeric and chile flakes and cook for another minute, until the spices are well mixed with the vegetables.  Stir in the salt to taste.  Sprinkle with the fresh lemon juice. 

My mom adapted her chicken recipe from the cookbook that I got her for her birthday, a new Cook's Illustrated cookbook called More Best Recipes.  Last year for my birthday she got meThe New Best Recipes , so we now we have both between the two of us. 

My Mom's Tandoori Chicken Cutlets
Serves 5-6
adapted from More Best Recipes, by Cook's Illustrated

Ingredients:
1 Tbsp vegetable oil
2 medium garlic cloves, minced and pressed through a garlic press
2 tsp minced or grated fresh ginger
1 tsp garam masala
1 tsp ground cumin
1 tsp chili powder
1/3 cup plain nonfat greek yogurt
1 Tbsp lime juice
1/2 tsp salt
5 chicken cutlets

Directions:
1. Heat the oil in a small skillet over medium heat until shimmer.  Addd the garlic and ginger and cook until fragrant (about 30 seconds).  Add the garam masala, cumin, and chili powder; cook another 30-60 seconds.  Transfer half of the garlic-spice mixture to a small bowl.  Add in the yogurt and 1/2 Tbsp of the lime juice and set aside.
2. In a second bowl, combine the remaining garlic-spice mixture with the remaining 1/2 Tbsp of lime juice and salt.  Drizzle it over the chicken cutlets, and then cover them loosely with saran.  Use a meat tenderizer to pound the marinade into the chicken cutlets. 
3. Preheat the grill.  Pour the yogurt mixture over the chicken, and coat each cutlet on both sids.  These grill quickly because they are so thing -- about 3-5 minutes.  They came out perfectly tender and juicy!

To combine the chicken and sqaushes, we sliced the chicken and then added it to the skillet with the squash for a minute or two on low heat to blend and heat through. 

If anyone is interested in the super spicy Green Chile Chutney, let me know and I can post it! 

Tuesday, July 20, 2010

Robin Miller's Banana Nut Scones

When we were in London on our honeymoon, we had an afternoon tea at the National Gallery.  It was one of our favorite meals of our trip -- everything was so cute, as well as so tasty.  Now as for the scone (which was served with clotted cream), let's just say, well, I was feeling kind of reluctant to share it with my new husband because it was so good!  (Here is where my sister will probably pipe in to tell you about my long-standing very poor reputation for sharing, a very poor quality to find in a pre-K teacher!)  But I remembered my vows, split the scone, and made a new vow to make some scones when we got back home!

I have made scones once or twice in the past.  I have tried to lighten up a few recipes on my own, with some mixed results, but I've also had a some success with a very loose interpretation of this rather old Cooking Light recipe. 

However, when I came across this recipe in what is, ahem, now my newest cookbook (The Newlywed Cookbook), I knew had to try it!  It was a scone recipe, and I could see that it was quite low in fat.  Plus, it was a great use for the container of buttermilk and two over-ripe bananas sitting in my fridge.  I whipped these up last night, and they made for a delicious breakfast...and with 12 scones in our kitchen, I didn't even have to share! 

Banana Nut Scones
yields 12 scones
from The Newlywed Cookbook, by Robin Miller

Ingredients:
2 3/4 cups all-purpose flour
1/3 cup (plus 1 Tbsp) granulated sugar, divided
2 tsp baking powder
                                 1/2 tsp baking soda
                                 3 Tbsp butter, chilled and cut up
                                 2 egg whites
                                 1/4 cup buttermilk
                                 1 tsp vanilla extract
                                 2 medium ripe bananas, mashed (about 1 cup)
                                 1/3 cup chopped walnuts
Directions:
1. Preheat oven to 400 degrees Fahrenheit.  Prepare a baking sheet with non-stick cooking spray.
2. In a food processor fitted with the metal blade, combine flour, 1/3 cup of the sugar, baking powder, baking soda, and salt.  Add butter and pulse to combine until the mixture resembles a coarse meal.  Alternatively, you could use a large bowl and mix with your hands.
3. In a medium bowl, whisk together the egg whites, buttermilk, and vanilla.  Stir in the bananas.  Fold mixture into the dry ingredients and mix until just blended.
4. Transfer dough to a lightly floured surface and knead 5 times.  Place dough on baking sheet and shape into a 9 inch circle.  Using a sharp knife, make 12 (1/4 inch deep) cuts in a spoke pattern across top of dough.  Sprinkle the top with walnuts and remaining tablespoon of sugar.  Press walnuts slightly into dough.
5. Bake 15-20 minutes, or until golden and a knife inserted near the center comes out clean.  Cool on a wire rack before slicing into 12 wedges.

Monday, July 19, 2010

His and Her's Power Salads

If there are two things I love in this world (well, beside my family), they are salads and stripes!  So this salad, in neat little rows, really made me happy.  It started off as a Cobb salad from EatingWell Comfort Foods Made Healthy, but I am not really sure that you can call anything a Cobb salad without the avocado and blue cheese!  Neither of us eat avocado, and I am the only one who eats blue cheese.  Sometimes when there is pricier ingredient like that that only one of us eats, we end up just skipping it to stay in our budget.  I could never eat up a whole container of blue cheese before it goes bad!  I will have to have that next time I'm at a restaurant!

But this cute little salad, if you like it like the Dishwasher or if you like it like the Cook, packs in a lot of protein, and is very refreshing on a hot day.  To tell you the truth, it was exactly what I was craving when we got back from Paris a couple of weeks ago.  Now, I love French food, and in fact, I ate myself into a tummy-ache one night.  So maybe that's why when we got back I was really craving a crunchy American salad!

His Power Salad (it's the one on the left!)
serves 1
Ingredients:
2-3 cups chopped red leaf lettuce
1/2 large skinless, boneless chicken breast, poached and diced
4 thin slices turkey bacon, cooked according to package directions and crumbled
2 hard-boiled eggs, chopped
1/4 feta cheese crumbles

Her Power Salad (it's the one on the right!)
serves 1
Ingredients:
2-3 cups chopped red leaf lettuce
1 diced plum tomato
1/2 cup diced peeled cucumber
1/2 large skinless, boneless chicken breast, poached and diced
2 thin slices turkey bacon, cooked according to package directions and crumbled
2 hard-boiled egg whites
1 Tbsp shredded low-fat Mexican blend cheese

Dressing for All
serves 4
Ingredients:
3 Tbsp red-wine vinegar
1/2 small onion, very finely chopped
1 Tbsp whole-grain mustard
freshly ground pepper to taste
a pinch of salt
4 tsp canola oil
1 Tbsp agave nectar

Directions:
1. Arrange each salad on plates, placing each ingredient in neat rows.
2. Whisk together the salad dressing ingredients.
3.  Pour about 2 Tbsp of dressing over each salad.  (You will have leftovers.  Enjoy them, this is a very well-balanced dressing.)

Sunday, July 18, 2010

Croque Tomate-Tomate

My husband and I are huge fans of the French grilled cheese sandwich known as Croque Monsieur.  In fact, during the four day stint we spent in Paris on our honeymoon, we ate a collective 7 Croque Monsieurs and Croque Madames!  To commemorate this (and just when we began to wonder if we ever wanted to eat another Croque Monsieur again..) I bought an entire cookbook on Croque Monsieurs, called, of course, Croquez Monsieur, by Philippe Conticini. 

This is my translation and fairly loose interpretation of one of those recipes.  This is a wonderful summer sandwich with two very different tomato flavors, a little Parmesan, a little smoked mozzarella, and some roasted garlic and basil.  The combination of tomato and cheese flavors is really wonderful.  We ate it with wedges of watermelon last night, for a perfect summer supper.

Croque Tomate-Tomate
Serves 4

Ingredients:
whole-wheat ciabatta
2-3 good medium tomatoes
2-4 cloves of garlic, in their skins
cooking spray
sea salt
black pepper
Herb and Garlic spice blend (look for one without salt, such as McCormick)
2 Tbsp tomato paste (I use the double strength kind in a tube, made by Amore)
4 tsp butter, softened
8 Tbsp shredded Parmesan, divided
a few leaves basil, chopped
about 3-4 oz smoked mozzarella, cut into 4 slices (about 1/4 to 1/2 inch thick)

Directions:
1. Preheat oven to 325 degrees.
2. Lightly mist a baking sheet with cooking spray.
3. Halve (or slice) the tomatoes.  (You want each chunk to be a good inch or so thick.)  Place the tomatoes and the cloves of garlic (still in their skins) on the baking sheet, and light mist with cooking spray.  Sprinkle salt, pepper, and the herb garlic blend over each tomato half.  Put in the oven and bake for 20-30 minutes.  Check on the garlic after 20 minutes -- once it browns a little and becomes soft, you can use tongs to remove it from the tray and leave the tomatoes in as you prepare the rest of the sandwiches.  Leave the oven on after you remove the tomatoes.
4.  Meanwhile, cut four chunk off the whole wheat ciabatta.  You want each chunk to be about 3-5 inches wide.  Slice each chunk in half to separate the top and bottom.
5. Place the softened butter, the tomato paste, 4 Tbsp of Parmesan cheese, and the shredded basil in a small bowl.  Add the roasted garlic.  (Once it has cooled slightly, you can cut the skins open and squirt it right out.)  Mix well to form a spread.
6. Spread the bottom half of each ciabatta chunk with the tomato-cheese mixture.  Then place a  slice of smoked mozzarella on top, covered by a hot wedge of tomato.  Cover each sandwich with the top half of the ciabatta.
7.  Okay, true confession here...this is how I seeded the tomatoes.  After closing each sandwich, I held them over the sink and squeezed a little.  Worked for me!
8.  Place each closed sandwich on the baking tray.  Sprinkle 1 Tbsp Parmesan cheese over each, and then sprinkle on a little herb and garlic blend. 
9. Pop the baking tray in the oven.  Turn the heat up to 400.  Bake for about 7-8 minutes, until the cheese has melted on top and you can see the smoked mozzarella become gooey.

Saturday, July 17, 2010

Smoky Gnocchi with Plenty of Veggies


Let it be known, and in case you couldn't already tell...I am not that cool.  Nope.  Not that cool.  On any given Friday night, I am not at some new hip bar or restaurant.  Nor a party.  Nope.  If I have things my way, on a late Friday afternoon, I can be found at Russo's.  Now, I hesitate to talk about Russo's on the Internet, because it is already too crowded.  So, if you don't know about this place, you should go there.  But don't let anyone else in on our little secret.
Russo's is a great market with a wide assortment of produce (fresh water chestnuts, curry leaves, dragon fruit), artisanal cheeses, fresh bread, a bakery, prepared foods, a salad bar, loads of ethnic and specialty goods (fresh harissa!) and a great chocolate aisle.  And the prices.  Oh, the prices!  Yesterday, I bought summer sqaush and zucchini for 29 cents a pound!  I was appallingly excited over this.
So, what I like to do at Russo's on a Friday is to be a little spontaneous about things.  We usually plan a menu for 4 dinners a week, but you know, sometimes on a Friday, it gets a little wild in the kitchen. 
And then we go to bed by 10, having really lived on the edge.
Here is last night's creation.  It was wild and wonderful, if I do say so myself.  My mom got me hooked on gnocchi growing up, and she always made it like this, with loads of veggies.  I have had poor luck eating it in restaurants, because it can be so heavy, but this is nice and light and suitable to be eaten in a heat wave. 

Smoky Gnocchi with Plenty of Veggies
serves 4

Ingredients:
About a pound of gnocchi (preferably tri-color)
8 thin slices of turkey bacon
1 large bunch spinach, chopped (about 6-8 cups)
1 large broccoli crown, chopped
salt
3 cloves garlic, pressed or finely diced
4 tsp olive or canola oil
1/4 tsp crushed red pepper flakes
1 tsp red wine vinegar
1/4 cup smoked mozzarella, finely diced

Direction:
1. Prepare gnocchi according to package directions, in salted water.  Before draining, reserve about a cup of the cooking water.
2. Meanwhile, cook up turkey bacon in a non-stick skillet on medium-high.
3. Once the turkey bacon is crisped up, remove it to a plate to cool.  Leave the pan on the burner.
4. Add the broccoli to the skillet with about 1/2 cup of water. Turn the heat down to medium.  While the broccoli is cooking, crumble or chop the bacon.
5. Once the water has boiled down, add the oil, and heat for 30 seconds.
6. Add the pressed garlic and red pepper flakes, and heat for another 30 seconds, until fragrant.
7. Add the spinach and saute, stirring frequently.
8. Once the spinach is wilted, add the cooked gnocchi to the skillet, and turn the heat up to medium high or to high.  Stir frequently.  You want to brown the gnocchi a little.
9. Add the starchy gnocchi water to the skillet, and turn the heat up to high.  Let the liquid thicken to create a sauce.
10. Turn off the heat, and add the red wine vinegar.  Stir through, and add the diced smoked mozzarella and the turkey bacon.  You want to heat the cheese through without becoming a stringy mess.  Serve immediately. 

Friday, July 16, 2010

EatingWell's Lemon Squares


I tried this recipe from my Eating Well Comfort Foods Made Healthy cookbook, but you can also find the recipe online right here, at the Eating Well website.  It's a great recipe!  I have always made a full fat, calorie-laden lemon bar, and the Dishwasher didn't even notice that the recipe wasn't the same!  I used a 9 inch square pan because I don't have an 8-inch pan, so my lemon squares came out a little flatter than they should.  These bars have just the right balance of tartness and sweetness, which is hard to come by in a lemon square.  I used all purpose flour as we didn't have any whole wheat pastry flour hanging around...add that to my shopping list too!  Next time I'd like to try this with limes or key limes...or even try the shortbread crust with a different topping.  Pecan squares would float my boat!


5 Answers for 5 Questions

Yesterday I was passed this survey from Dawn at Florida Coastal Cooking.  I love the recipes and photos on this blog.  It is especially exciting to see Dawn try out different EatingWell recipes!

(Also, I was secretly sort of excited to discover that people who are not related to me are actually reading this, but now I guess that's not a secret anymore.)

5 Answers for 5 Questions

1.) What was on your To-Do list today:
-- Write 3 thank-yous (for weddding gifts) (um, there is some procrastination going on related to this task)
-- fold laundry
-- research dry cleaners for wedding dress
-- write up grocery list
-- narrow down wedding pictures to order album
2.) 5 Snacks you enjoy:
-- JP Licks non-fat sugar-free frozen yogurt (I have a feeling my husband is going to comment about this!)
-- Kashi GoLean Crunch Chocolate Caramel Bars
-- homemade mini-muffins
-- Quaker Rice Cakes
-- FiberOne 90 calorie bars
3. ) 5 Places you have lived:
-- White Plains, NY
-- South Colonie, NY
-- Delmar, NY
-- Greenwich, CT
-- Aix-en-Provence, France
4.) What were you doing 5 years ago:
-- had first job as a real teacher, not an intern
-- got my own apartment, all to myself
-- related to the above, made a lot of trips to IKEA
-- walked 60 miles to raise money for Susan G. Komen for the Cure (towards breast cancer research)
-- shopped a lot, and in spare time, read about shopping
5.) 5 things you would do if you were a Billionaire:
-- buy us a house with a great kitchen for me and a library for the Dishwasher
-- buy a second house in the South of France
-- buy a really fabulous purse.  And then another.  And another.
-- buy groceries at Whole Foods
-- give money to my mom and my sister and any other relatives who are reading this

Thursday, July 15, 2010

Pear Bread

This quickbread is one of the Dishwasher's favorite treats.  It is incredibly moist, and the the mix of the nutmeg with the pears is heavenly.  The recipe comes from Boston Tea Parties, a great collection of tea sandwiches, bars, cookies, and quick breads published alongside prints from the Museum of Fine Arts here in Boston.

I have always followed this recipe to a T, but I think next time I would like to try adding some fresh raspberries or white chocolate chips.  What do you think?

Pear Bread

Ingredients:
1/2 cup unsalted butter, softened
1 cup sugar
2 eggs
1 tsp vanilla
2 cups flour
                                 1 tsp baking powder
                                 1/2 tsp baking soda
                                 1/2 tsp salt
                                 1/8 tsp nutmeg
                                 1/4 cup buttermilk
                                 1-2 coarsely chopped pears
                                 1/2 cup chopped nuts (optional)

Directions:
1.  Preheat oven to 350 degrees.  Coat at 9 x 5 x 3 inch loaf pan with cooking spray or butter.
2. Cream butter.  Add sugar and beat until light and fluffy.
3. Add eggs and vanilla and beat well.
4. Sift together flour, baking powder, baking soda, salt, and nutmeg.
5. Add the dry ingredients to the wet alternately with buttermilk.  Do not overmix.
6. Gently fold in pears, and nuts if using.
7.  Pour into loaf pan.
8. Bake at 350 until a knife comes out clean.  (The recipe says 50-60 minutes, but last time it took me 70!)

Wednesday, July 14, 2010

Mocha Popsicles

What's colder than an ice cold mocha?  Mocha popsicles!  This recipe takes about ten minutes to prepare, is very light in fat and calories, and, very importantly in such hot weather...is very, very cold and refreshing.  Let's not talk about how many of these I've been eating a day. 

I adapted this recipe (very slightly) from Eating Well on a Budget.  The Dishwasher and I love Eating Well and love their cookbooks, and we both think this newest cookbook is one of the best we've bought.  The yield for this recipe will depend on the popsicle molds that you use.  I got 6 popsicle plus half a cup of extra liquid, which I drank, happily and guiltlessly.  I bought myself these Tovolo popsicle molds from Amazon.com a few months ago, and I really, really love them.  The tray at the bottom catches drips from even the messiest of eaters (ahem), and it makes a nice adult-sized popsicle. 


Mocha Popsicles

The original recipe calls for regular half-and-half...and the portion size is very small, so you could go ahead and use that.  I happen to like to eat, well, multiple of these a day and am therefore glad I went with the fat-free half-and-half.

Ingredients:
2 cups hot brewed coffee
4 1/2 Tbsp sugar
2 Tbsp unsweetened cocoa powder
1 cup fat free half-and-half
1/4 tsp vanilla extract
a pinch of salt

Directions:
1. Whisk the sugar and cocoa powder into the hot coffee until they have dissolved.
2. Whisk in the half-and-half, the vanilla extract, and the salt.
3. Pour into your popsicle molds, insert sticks, and freeze for at least 6 hours.  Run your popsicles under hot water for a minute or two to unmold them.

P.S.  When they say wait 6 hours, they aren't kidding.  I tried to cheat, and it didn't end well.

Tuesday, July 13, 2010

Ooops, I bought a new cookbook...

So, I kind of, well, like, totally have a lot of cookbooks.  And when I say a lot, I mean, a lot.  I am pretty sure that I have more than her, but who's counting? 

And, I kind of, well, sort of, like, got another one.  But, in my defense, it was on my mental list of Cookbooks I Will Buy If I Find Them At a Very Good Price.  And I did...find it at a very good price.  And now it is happy on my night table.

I put this one on my list after borrowing it from the library a few months ago.  Okay, here is another embarrassing disclaimer.  I read cookbooks.  Like some people read novels.  In bed.  In the car.  The location and time are not important to me, but let's just say my cookbooks probably spend just as much time out of the kitchen as they spend in it. 

And this one, Modern Spice by Monica Bhide, was hard to put down.  Not only did the recipes look great, but Bhide has interspersed them with short essays and memoirs.  Among my favorites was a story about searching for authentic food in Dubai, and another about the author counting peas with her young son.  The essays are short and sparse, and this is definitely in the category of "a cookbook with a few very short stories" and not the category of "a book with a few very short recipes."

This is not a traditional Indian cookbook, but instead a modern cookbook that combines Indian flavors with international cuisine.  There is a long chapter of cocktails and drinks that I can't wait to delve into, including Guava Bellinis and Ginger Tea.  I am also looking forward to trying Indian-Style Chili in Bread Bowls, Pomegranate Shrimp, and Brussels Sprouts, Leeks, and Curry Leaves.  Perhaps I am alone here, but what could be more exciting than Brussels sprouts Indian style?